Cornerstone CX Quick Start Guide
The purpose of this guide is to assist new and/or existing Cornerstone CX customers in the setup and initial configuration, to move into full production with Cornerstone CX Contact Center Users and/or Unified Communications Users (Unison), in less than 30 minutes to complete.
1. Before You Start
This Quick Start Guide assumes you have the following already in place:
- An AWS Account opened and established (the AWS Account you will be using for Amazon Connect).
- An Amazon Connect Instance is setup (in the above AWS account), configured with working Call Flows and a claimed telephone number for dial in.
- Amazon Connect Agents already setup and configured with Routing Profiles.
- You have signed up and established your company profile with Cornerstone CX via the AWS Marketplace (refer to AWS Marketplace Sign up).
- You have a Cornerstone CX Administrator Login/Password (provisioned during your initial sign-up process) to the Cornerstone CX Administration Portal.
2. Whitelist your URL
The Cornerstone CX agent/user UI replaces the the out the box Amazon Connect CCP from a user perspective. This domain URL must be white-listed as an Approved Origin for your Amazon Connect Instance for the Cornerstone CX agent/user UI to function correctly.
When logged in to your AWS Account, from the AWS Console:
-
Navigate to the Amazon Connect service page.
-
Click on your Amazon Connect instance that you will be integrating your Cornerstone CX with.
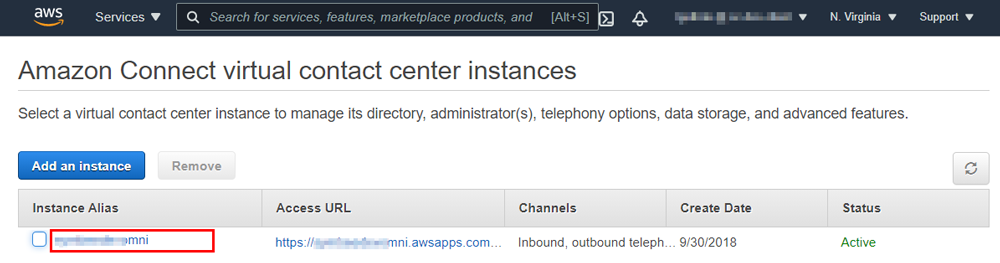
- In the left navigation pane, choose Approved Origins, and select + Add Origin
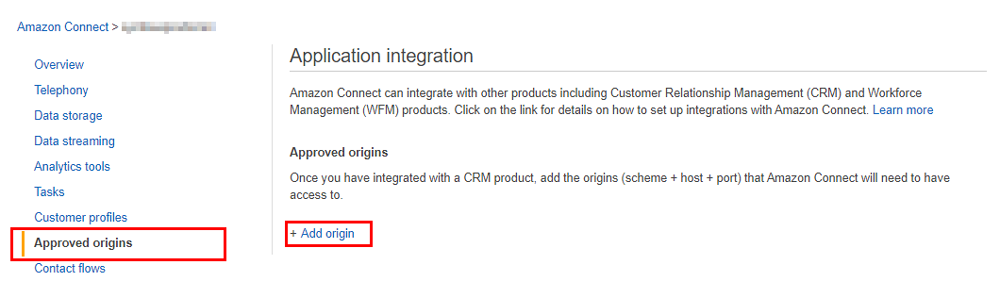
- Enter your Cornerstone CX domain (https://cornerstonecx.co.nz) as a new Approved Origin. This is the same domain as is used in your Cornerstone CX Administration Portal URL.

3. Add Agent Statuses in Amazon Connect
A Cornerstone CX user can be configured in one of 3 different Application Modes:
- Omnichannel: The complete Contact Center Agent mode, supporting all features of both Amazon Connect and Cornerstone CX, including the options for Supervisor, Presence, user to user Instant Messaging, and all the additional channels provided by Cornerstone CX.
- Engage: A more basic Contact Center Agent mode than Omnichannel mode above, still provides the Cornerstone CX overlay for the Amazon Connect CCP, adding features like Call History, Realtime Agent Statistics, Blind Transfer, etc., but doesn't include options for Supervisor and all the additional channels provided by Cornerstone CX.
- Unison: The non Contact Center user mode, providing a complete back-office Unified Communications (UC) user interface, without all the Contact Center features, but still includes UC features such as phone calling, presence, Instant Messaging, Extension and DID dialing, etc.
To use either of the Omnichannel or Unison modes, Cornerstone CX requires two additional Agent Statuses to be configured within your Amazon Connect Instance. These Agent Statuses are not visible to the agent within the Cornerstone CX UI but are required for correct operation.
When logged in to your AWS Account:
-
Navigate to the Amazon Connect service page and open the the Amazon Connect Administration console for the instance you are integrating with Cornerstone CX.
-
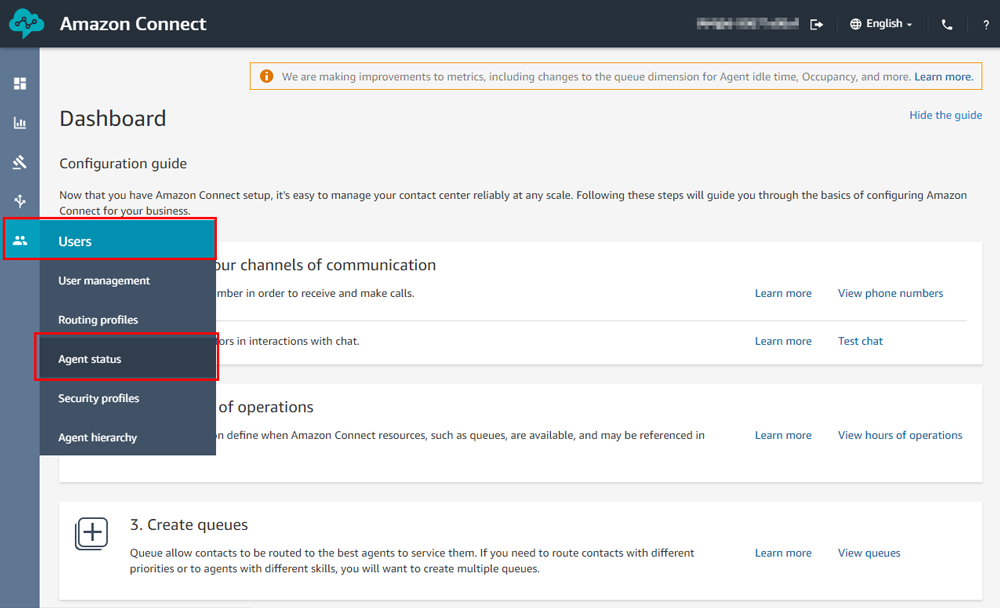
Within the Amazon Connect console, in the left navigation, select Users and then Agent Status.
-
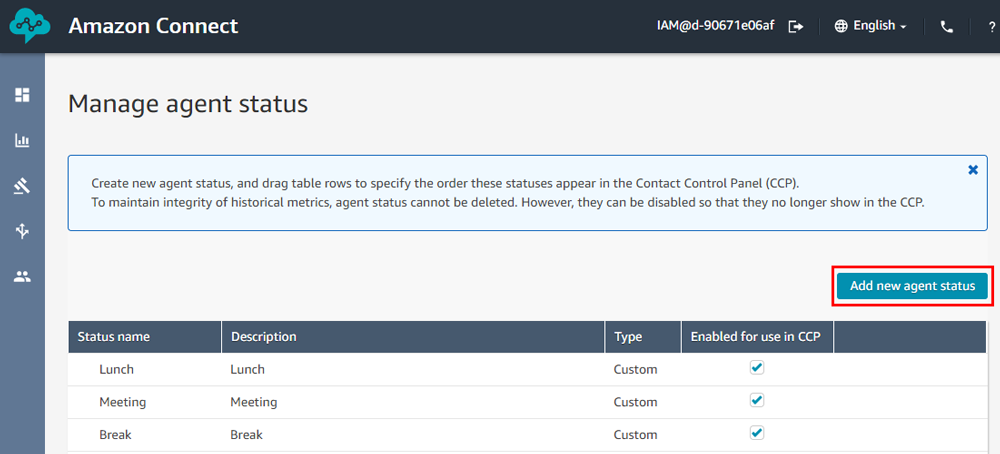
On the Manage Agent Status screen, click the Add new agent status button to add the 2 new statuses
-
Create the two new (required) Agent Statuses named exactly per the screen shot below, and ensure you the Enabled for use in CCP box is checked for both
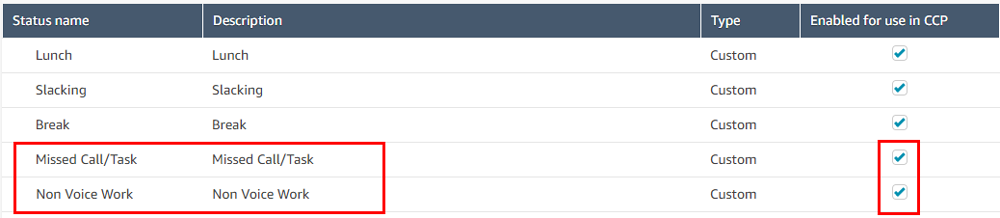
Note: The above are the default values. The exact names of these new Agent Statuses above need to match the same values configured within your Cornerstone CX User Profiles (within the user profile/template, under the AWS Integration, Amazon Connect Integration section) - specifically the Amazon Connect Reserved User State Name and Amazon Connect Missed Call/Task User State Name setting values.
4. Configure Amazon Connect Integration Page
-
Login to the Cornerstone CX Administration Portal.
-
If you have more than one Environment configured within your Company in Cornerstone CX, make sure you have the appropriate one selected. This can be found on the top Navigation bar.
-
Click on the Environment Configuration option on the left side navigation bar and the select Amazon Connect Integration located under the Amazon Connect section.
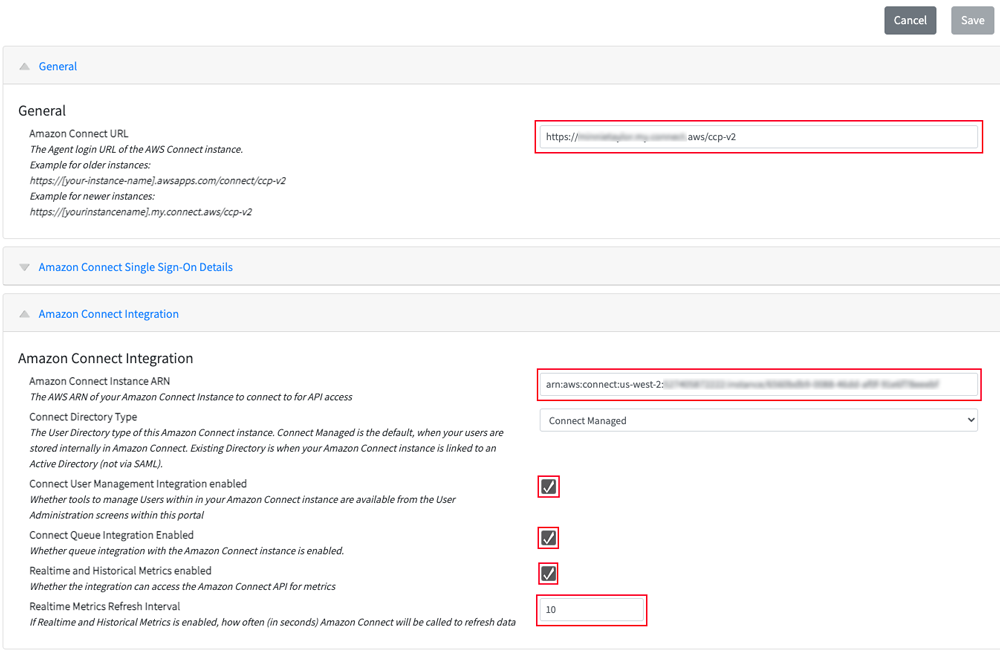
- General Section:
- Amazon Connect URL should be pre-populated from when you signed up.
- Amazon Connect Integration Section:
- Populate the ARN - copy from Amazon Connect Administration Console under the Overview section
- Connect User Management Integration Enabled check box should be ticked.
- Connect Queue Integration Enabled check box should be ticked.
- Realtime and Historical Metrics Enabled check box should be ticked.
- Realtime Metrics Refresh Interval should be set to 10.
5. Run CloudFormations
Overview
It's not mandatory to run any CloudFormations, however, if you want to utilize any of the optional Cornerstone CX features, or you wish to use certain Cornerstone CX channels that keep you customer data in your AWS account, you will need to run some of the CloudFormations in your account when you want to start enabling those features.
To start, we recommend running two simple CloudFormations below, that will together, provide immediate access to Real-time Queue Statistics for agents on the desktop, User Management through the Cornerstone CX Administration Portal, and the ability to import Amazon Connect Queues into Cornerstone CX to allow you control of ACW at a Queue level.
The order in which you deploy some of the CloudFormations is essential otherwise they will error. Specifically, you must download and deploy the Cornerstone CX Integration CloudFormation first. See steps below.
Initial Integration CloudFormation
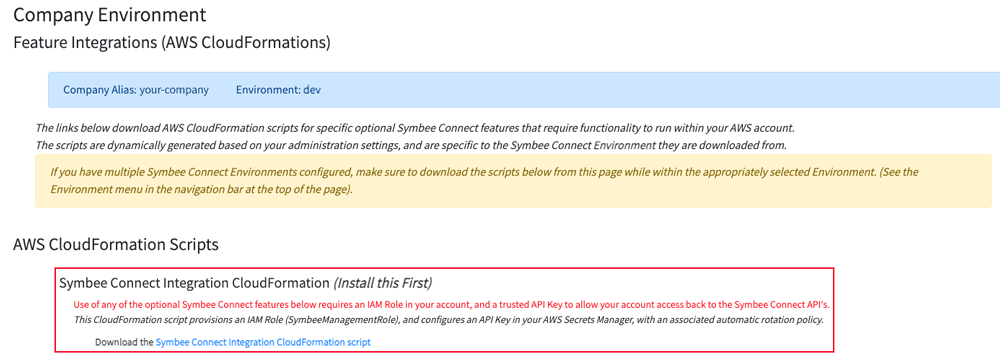
Use of any optional Cornerstone CX features requires an IAM Role in your account, and a trusted API Key to allow your account access back to the Cornerstone CX API's. The prerequisite Cornerstone CX Integration CloudFormation provisions this IAM Role and configures an API Key in your AWS Secrets Manager, with an associated automatic rotation policy.
- Click on Environment Configuration in the left side navigation bar and select Feature Integrations (CloudFormations) under the Cornerstone CX section.
- Click on Download the Cornerstone CX Integration CloudFormation script which is the first CloudFormation in the list.
- You will be prompted with a Save As dialog screen.
- Save the IntegrationCloudFormation.yaml file locally to your PC for use in the following steps.
- Log Into your AWS Management Console.
- Make sure you are in the correct AWS region for where you want to deploy (this can be found on the top right of the Navigation bar).
- Click on Services at the top, and under Management and Governance, choose CloudFormation.
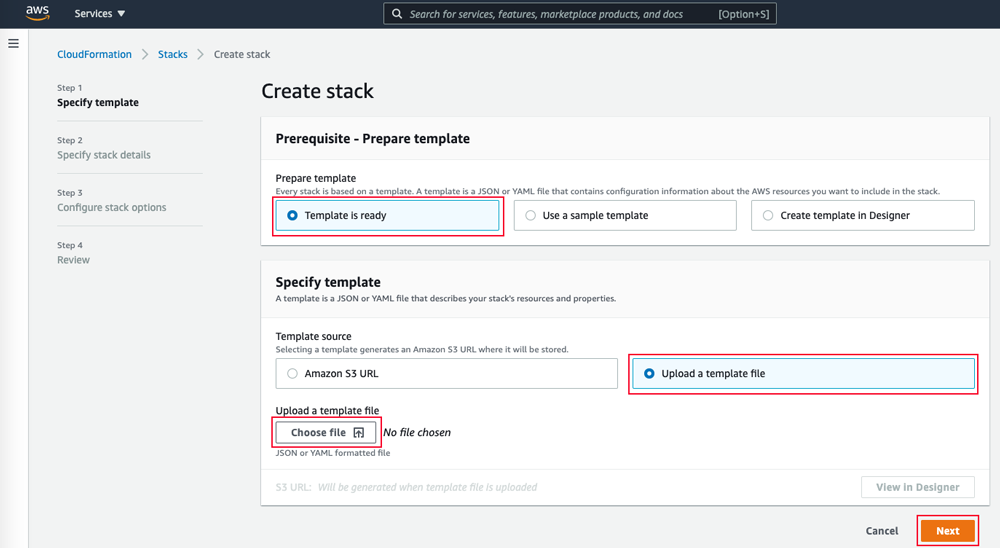
- From the CloudFormations console, select Stacks in the left-hand navigation bar, and select Create Stack and select With new resources (standard).
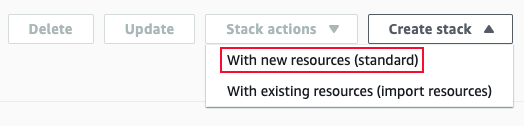
- You will be presented the Create Stack view for creating/deploying a new CloudFormation script (known as a stack):
- Under the Prepare Template section, select Template is Ready
- Under Specify Template, select Upload a template file
- Under Upload a template file, click Choose File
- In the resulting file selector, find and upload the file you saved from Step 3 above.
- Click Next at the bottom
- In the Specify Stack Details screen, all that is needed is a name for the stack. Enter an appropriate name.
We suggest using your Cornerstone CX Environment (e.g. dev, prod, etc.) in the name for better organization, in case you have CloudFormations for multiple Cornerstone CX Environments Connect being deployed into the same AWS Account.
For example:
companyalias-environment-integration - Click Next
- On the next Configure stack options screen, accept all the defaults, and click Next.
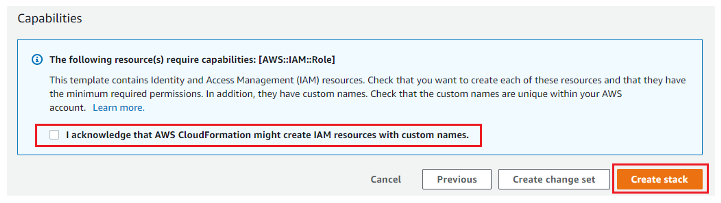
- On the next Review testing screen, scroll to the bottom Capabilities section, check the “I acknowledge that AWS CloudFormation might create IAM resources with custom names.” Checkbox, and finally click Create Stack.
Amazon Connect Management and Real-time Statistics CloudFormation
This CloudFormation creates an IAM Policy to allow access to the Management and Metrics API’s of your Amazon Connect instance. It allows your Amazon Connect Users, Queues and Contact Flow names to be visible in this Administration Portal and supports access to Real-time Statistics for your Amazon Connect queues.
- From the Cornerstone CX Administration Portal, click on the Environment Configuration from the left side navigation bar and choose Feature Integrations (CloudFormations) under the Cornerstone CX section.
- Click and download the Amazon Connect Management and Real-time Statistics CloudFormation script.
- You will be prompted with a Save As dialog screen.
- Save the .yaml file locally to your PC for use in the following steps.
- Log Into your AWS Management Console.
- Make sure you are in the correct AWS region for where you want to deploy (this can be found on the top right of the Navigation bar).
- Click on Services at the top, and under Management and Governance, choose CloudFormation.
- From the CloudFormations console, select Stacks in the left-hand navigation bar, and select Create Stack.
- You will be presented the Create Stack view for creating/deploying a new CloudFormation script (known as a stack).
- Under the Prepare Template section, select Template is Ready
- Under Specify Template, select Upload a template file
- Under Upload a template file, click Choose File
- In the resulting file selector, find and upload the file you saved from Step 3 above.
- Click Next at the bottom
- In the Specify Stack Details screen, all that is needed is a name for the stack. Enter an appropriate name.
- Click Next
- On the next Configure stack options screen, accept all the defaults, and click Next.
- On the next Review testing screen, scroll to the bottom Capabilities section, check the “I acknowledge that AWS CloudFormation might create IAM resources with custom names.” Checkbox, and finally click Create Stack.
For additional information, descriptions and step by step instructions for CloudFormations, check out our section called AWS CloudFormations.
6. Set up a New User
Overview
All Cornerstone CX features are optionally configurable, with the end-user features being controlled on a user by user level. As a result, each end user needs a User Profile defined within Cornerstone CX. The Cornerstone CX User Profile basically extends the Amazon Connect user definition, and configures which Cornerstone CX features are enabled for the end user.
Although you can configure Cornerstone CX end users on an individual user by user basis, for ease of management, User Templates are provided which you set up for each logical group of users, then configure the required features on the User Template, and then bulk-apply the User Template to a group of users all in one step.
User Templates
User Templates are configured to apply end user settings to single users or multiple users at one time. Once you configure the User Template with the settings you want, you can apply the User Template to a User Profile.
Before you can add a new Cornerstone CX user, you need to setup a User Template. There is one default user template built with every account, however, we recommend you create your own User Templates based on your environment.
User Types
There are two fundamental types of Users defined within the User Administration section of the Cornerstone CX Administration Portal:
-
Unified Communications Users - this refers to a non-contact center user using Cornerstone CX Unison.
-
Contact Center Users - this refers to a contact center user using Cornerstone CX Engage.
Create a new User Template
-
From the Cornerstone CX Administration Portal, click on Contact Center Adminstration and choose User Templates under the Users section.
-
Click Add Template:
- Enter a Template Identifier - this will be displayed in the pick-list. Example: Sales Team
- Enter a User Profile Template Name - this is a short description for the new User Profile Template.
Example: New York Sales
-
Press Save. The new template will now appear in the User Template list - you will now need to modify the template after it has been created. The following section outlines our recommended changes to get started.
Modify the new User Template
-
Click the check box of the template you have just created and click the Modify button.
-
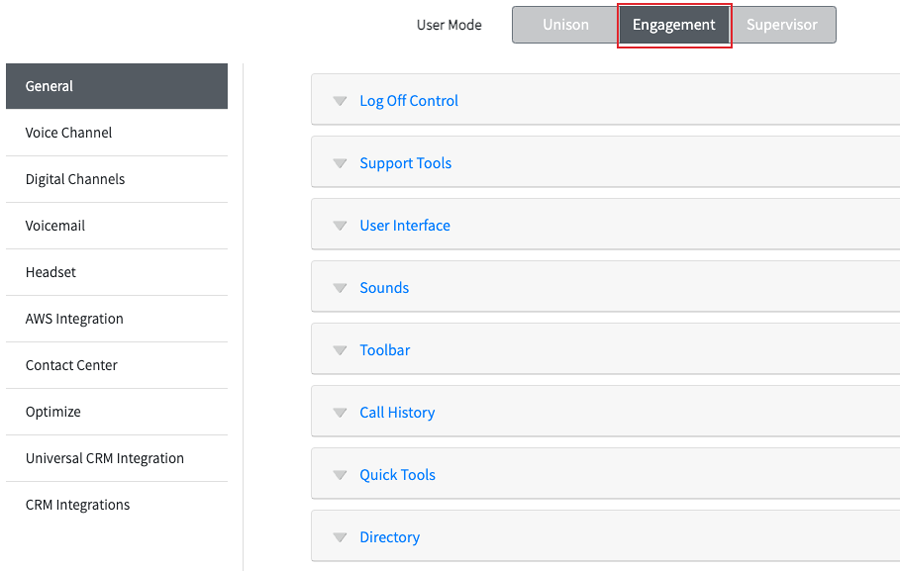
The following Maintain User Template screen will appear:
-
Make sure Engagement is select.
-
Here are the basic template changes we recommend to get you started:
General: Sounds:
Chat Notification Tone Enabled
General: Toolbar:
Every check box Enabled
AWS Integration: Amazon Connect Integration:ACD Amazon Connect Integration Enabled
Contact Center: Interaction Handling:
Wrap (ACW) Enabled for Amazon Calls/Chats Enabled
Wrap (ACW) Enabled for non Amazon Connect Tasks Enabled
Contact Center: Work Codes:
Enabled
Add a new User
-
From the Contact Center Administration screen, select which User Type you want to add from the left side navigation bar:
-
Unified Communications Users: Non-contact center user.
-
Contact Center Users (default)
-
Select Add User.
-
Select the new template from the dropdown box:
-
Add User based on Template:
-
The populate the following section with the user details
- Login Name - Note: this must match the user created in Amazon Connect
- First Name
- Last Name
-
Select Add Users on the top right. The new user will now appear in the users list.
For more information about modifying, adding and deleting Users and User Profiles, check out our section on User Administration.
7. Test Core Telephony Features
Login to Cornerstone CX
Once you have a new user, you need to be able to login to Cornerstone CX.
- From the Home page of the Administration Portal, which should default to Cornerstone CX, click the Cornerstone CX User Shortcut located at the bottom of the screen.
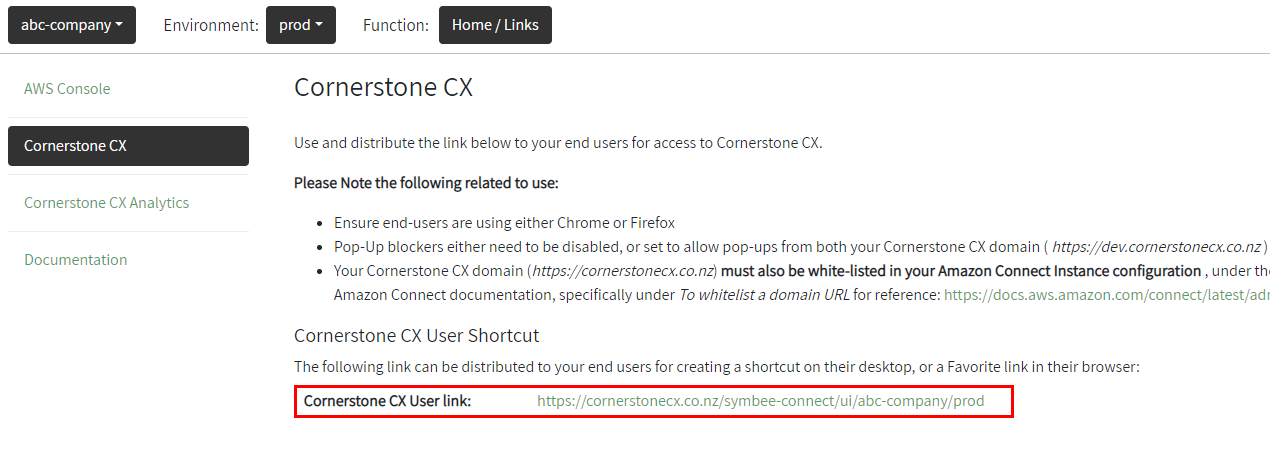
- This will launch Cornerstone CX.
- Click Sign In.
- Enter the Username and Password you created.
- Allow any notifications or pop-up blockers from Cornerstone CX. (For Browser Security Settings click here)
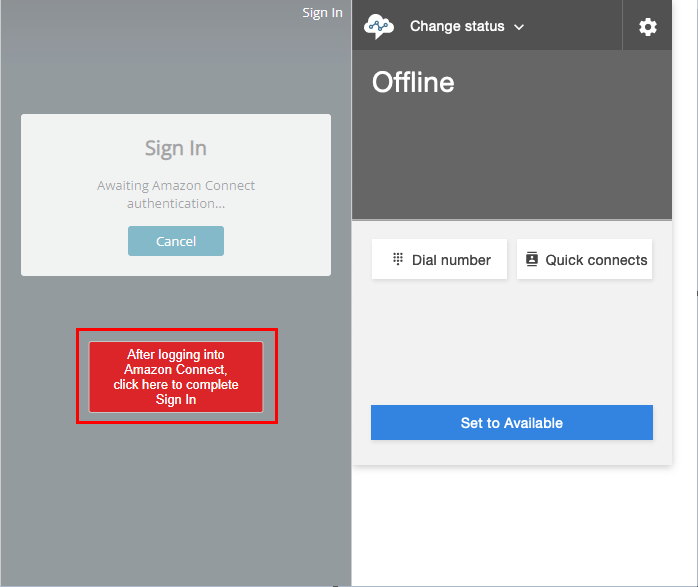
- Once Amazon Connect successfully launches:
- Go back to the Cornerstone CX Login Box.
- Click the red After logging into Amazon Connect, click here to complete Sign In button to launch the Symbee Client and it automatically close Amazon Connect CCP.
Test Outbound Calling
- From the Cornerstone CX UI, click the Plus button on the left to start a new interaction.
- Use the drop down box to select Phone.
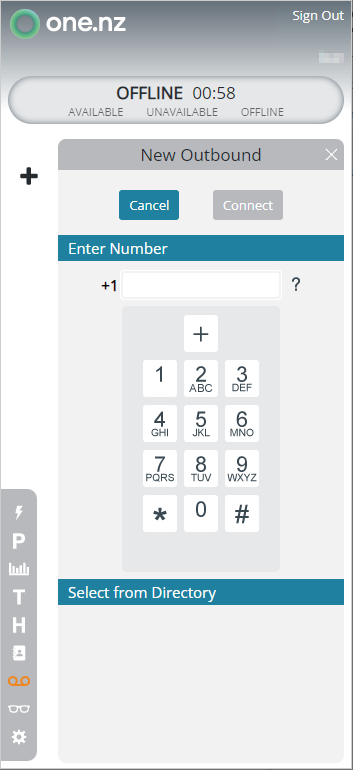
- Enter the phone number you want to call and press Connect.
- Once the phone number is answered, the screen will turn blue and show OCCUPIED.
- Use the Hang Up button to end the call.
8. Next Steps
All Cornerstone CX features are configurable, many at the user profile level. We suggest you start going through the User Profile options (select Contact Center Administration, then Contact Center Users under the Users section) and configure those relevant to your environment.
For more information about the configurable settings, check out our Administration Guide.