Cornerstone CX CloudFormations
Overview and Purpose
Cornerstone CX is a true pay-as-you-go Software-as-a-Service (SaaS) cloud solution. All functionality is managed and maintained within the Cornerstone CX cloud, and not within your AWS Account. We take the responsibility of regularly maintaining, upgrading, and enhancing the Cornerstone CX solution.
Security is our primary concern. As such, our mandate is to keep the functionality managed 100% within our SaaS cloud, but not your data or customer information. Your data and customer information belongs and resides within your AWS account.
All of the Cornerstone CX AWS CloudFormations provided are optional, and depend on what or how much of the Cornerstone CX functionality, channels, or CRM Integrations you choose to use.
Therefore, certain Cornerstone CX features require access into your AWS Account to either push generated data (for example Voicemail, where the actual saved voicemails are stored in your AWS account), or to access Amazon Connect API's to provide easier management (for example, visibility of your Amazon Connect Users and Queues from your Cornerstone CX Administration Portal) or enhanced user features (for example, displaying Realtime Queue Statistics in the Agent UI).
What is AWS CloudFormation?
AWS CloudFormation is a service that allows creation, setup and configuration of resources in an AWS account in a scripted fashion, rather than having to create, provision or import the objects via manual steps using the AWS Console. For more information, see: AWS CloudFormation
Cornerstone CX uses pre-configured AWS CloudFormation scripts to automate the setup of optional resources in your AWS Account that are needed if you choose to use various Cornerstone CX features.
Prerequisites and First Steps
The Cornerstone CX CloudFormation scripts are downloaded from your Cornerstone CX Administration Portal, and are dynamically generated based on your Cornerstone CX configuration.
Initial Integration CloudFormation
Use of any optional Cornerstone CX features requires an IAM Role in your account, and a trusted API Key to allow your account access back to the Cornerstone CX API's. The prerequisite Cornerstone CX Integration CloudFormation provisions this IAM Role and configures an API Key in your AWS Secrets Manager, with an associated automatic rotation policy.
- Click on Environmental Configuration on the left side navigation bar and select Feature Integrations (CloudFormations) under the Cornerstone CX section.
- Click on Download the Cornerstone CX Integration CloudFormation script which is the first Cloudformation in the list.
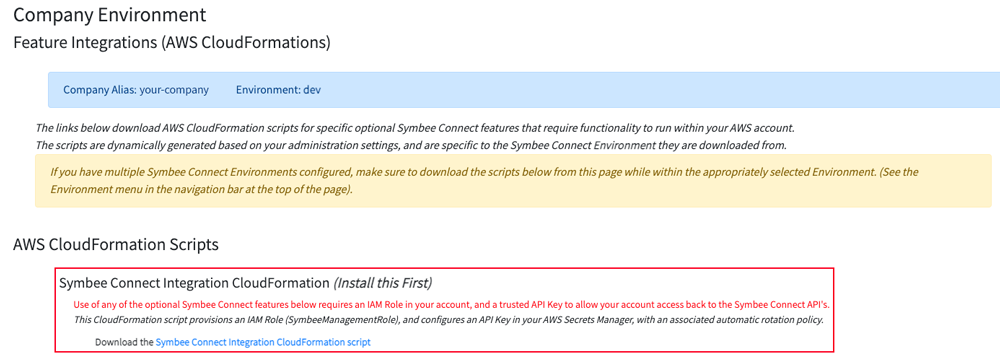
- You will be prompted with a Save As dialog screen.
- Save the IntegrationCloudFormation.yaml file locally to your PC for use in the following steps.
- Log Into your AWS Management Console.
- Make sure you are in the correct AWS region for where you want to deploy (this can be found on the top right of the Navigation bar).
- Click on Services at the top, and under Management and Governance, choose CloudFormation.
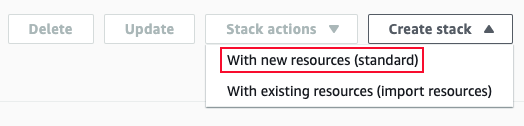
- From the CloudFormations console, select Stacks in the left-hand navigation bar, and select Create Stack and select With new resources (standard).
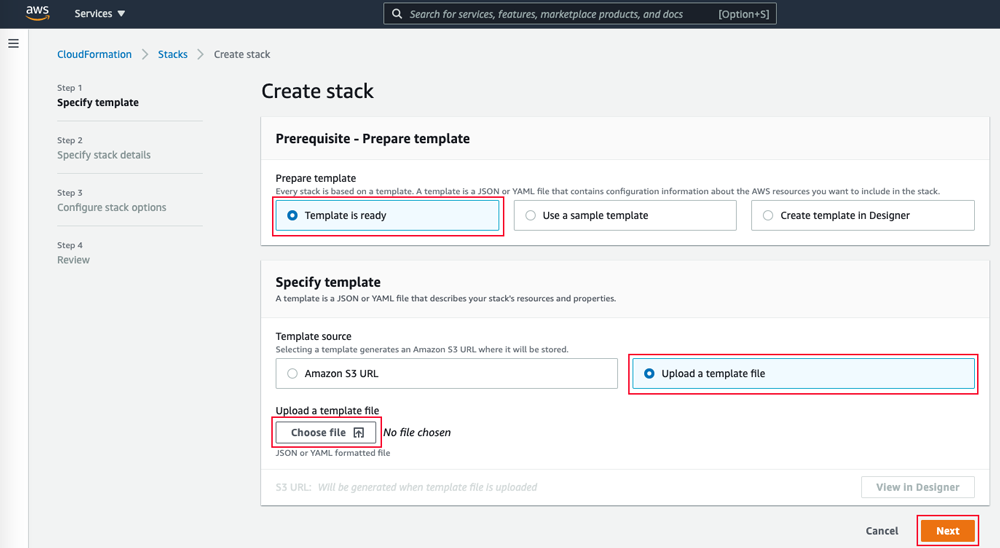
- You will be presented the Create Stack view for creating/deploying a new CloudFormation script (known as a stack):
- Under the Prepare Template section, select Template is Ready
- Under Specify Template, select Upload a template file
- Under Upload a template file, click Choose File
- In the resulting file selector, find and upload the file you saved from Step 3 above.
- Click Next at the bottom
- In the following Specify Stack Details screen, all that is needed is a name for the stack. Enter an appropriate name.
We suggest using your Cornerstone CX Environment (e.g. dev, prod, etc.) in the name for better organization, in case you have CloudFormations for multiple Cornerstone CX Environments being deployed into the same AWS Account.
For example:
companyalias-environment-integration - Click Next
- On the next Configure stack options screen, accept all the defaults, and click Next.
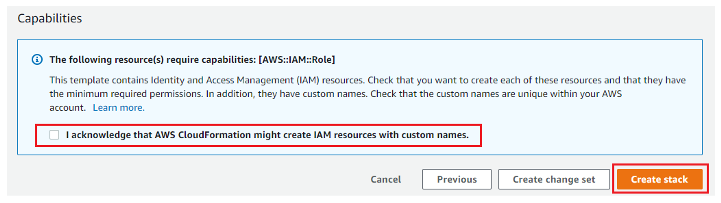
- On the next Review testing screen, scroll to the bottom Capabilities section, check the “I acknowledge that AWS CloudFormation might create IAM resources with custom names.” Checkbox, and finally click Create Stack.